
Creating an online course is a lot like building a machine. There’s a lot of planning and a whole lot of parts to it. Too many entrepreneurs dive head first into e-learning without really knowing what they’re getting themselves into. They get lured by the money, but get caught off guard by the work!
I know how overwhelming starting an online course can be, which is why I wanted to create a guide for every new ‘edupreneur.’ While I can’t promise you this guide will guarantee your course’s success, I CAN promise you that it will save you a lot of time and a lot of stress. Honestly, I wish someone had given me this list before creating my first course.
So here you have it! From me, a seasoned education technology expert (that has created online courses for the top guns in the industry like Digital Marketer), to YOU!
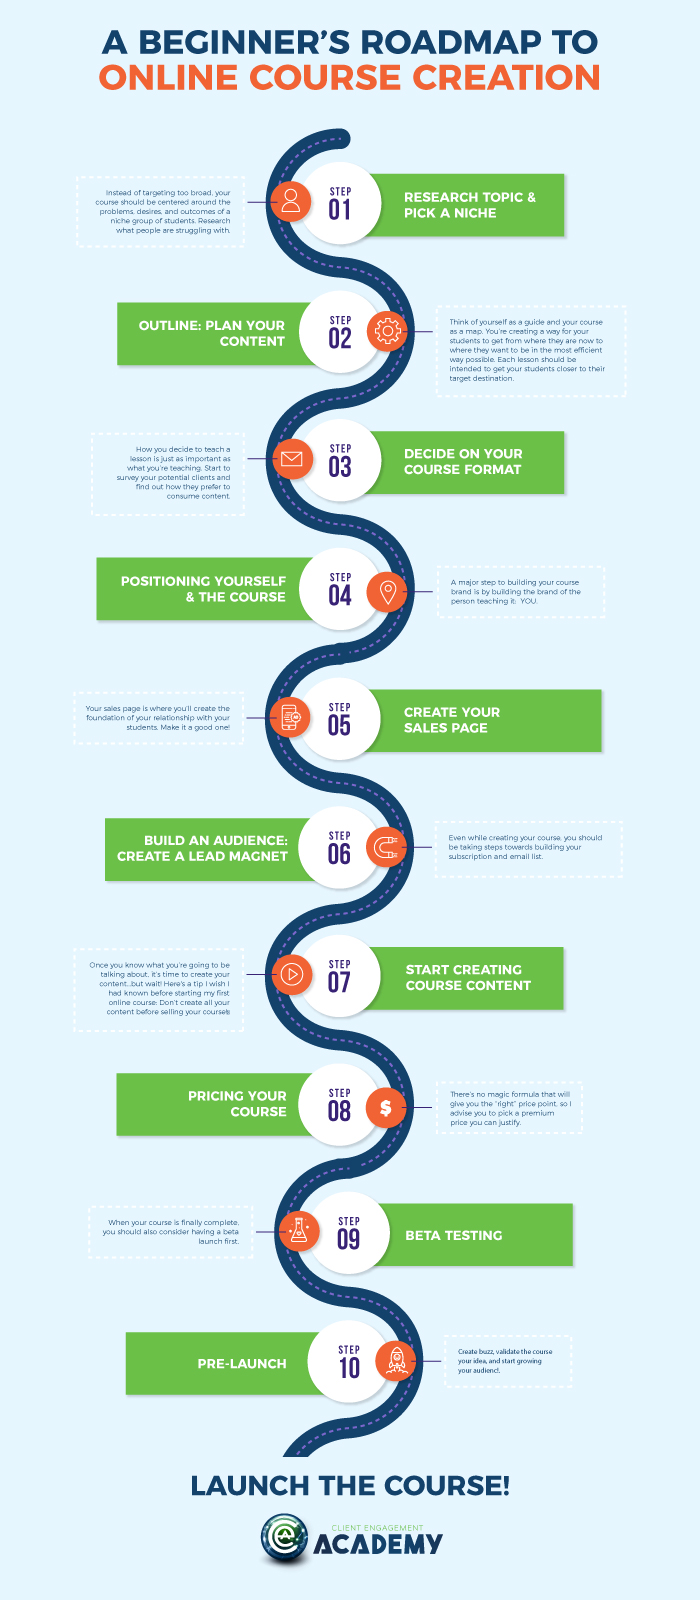
Step #1: Research: Picking Your Niche
“The more, the merrier” applies to a party—not your online course. Too often, inexperienced course makers believe creating a broad and lengthy course will appeal to more students and thus, make it more marketable. However, the opposite is true.
Instead of targeting too broad, your course should be centered around the problems, desires, and outcomes of a niche group of students. Research what people are struggling with. Find out what your audience wants out of a course.
Why are they even taking one? How would an online course on your topic benefit them? How would YOUR online course benefit them more?
The goal is to find a common problem your target audience has and then position your course as a solution. If you have a general idea of who you want to target and what you want to teach but don’t know your niche yet, follow these steps:
- Interview with your target audience. Aim to set up at least 5 interviews. Ask them about their personal/professional life, where they see themselves in x years, and where they want to be. Being able to meet with your clients one-on-one will allow you to understand their issues more deeply. You’ll also be able to hear about their problems directly from them in their language.
- Find their common struggle. Compare your results and find the common frustrations your clients have. What level of knowledge do they have in your course topic—are they “beginners” or “experts”? What gaps in knowledge do they have? Do they have a shared desired outcome?’
- Be the solution. Establish what outcome your course will produce. Then, think about HOW you’re going to create results for your target audience. Understand what lessons and concepts your clients need you to teach specifically.
After that, it’s on to step 2!
Read More: A Simple Formula for Attracting the Right Audience to Your Online Course
Step #2: Outline: Planning Your Content
Think of yourself as a guide and your course as a map. You’re creating a way for your students to get from where they are now to where they want to be in the most efficient way possible. Each lesson should be intended to get your students closer to their target destination.
The best way to organize your content is by organizing your objectives. Step one is to create a general course objective and step two is to create an objective for each lesson. You must be able to state what the learner will learn or what new skills the learner will possess from EACH lesson. You create an objective by stating the specific outcome the course and lesson will create. The key once again is less is more.
Remember, we live in a fast-paced, digital world. Attention spans are short, and people don’t have a whole day to spend going through your course lesson. Rather than overloading your audience with knowledge, only include lessons, resources, and activities that make the best use of their time and effort.
Receive free online course and membership site business advice,
weekly blog posts, podcast and video content. Sign up now.
One question I often get asked is, “What is the best type of content to offer?”
The best type of content is the content that will get the job done and help your students achieve their outcomes. How you decide to teach a lesson is just as important as what you’re teaching. Start to survey your potential clients and find out how they prefer to consume content.
Ask them: How long would you like each lesson to be? What kind of content do you like? How do you consume it?
Depending on your feedback, you may decide to create
According to a recent study conducted by Pearson, 59% of Gen Z and 55% of Millennials use YouTube as their #1 learning tool. Today, video has become the most popular format for online courses. And for good reason! They’re accessible, engaging, and aid visual learning.
It’s a no brainer to implement video in your online course. What you need to decide is if you’re going to teach on or off camera. Most online course creators find success starting with just screencast videos. However, I do recommend having at least the occasional talking head video to make your course more personal. Being on camera will let your students see who you are and allow them to associate you with their (hopefully) positive feelings about the course. This will make them more inclined to take more courses from you later on.
Whether you teach on or off camera, you need to make sure your videos’ audio levels are up to par. Purchasing an external microphone is a good investment. Plus, with so many models out there, you’ll be able to find plenty of budget-friendly options.
Additionally, you should also support your videos with other content, such as text, PDFs, and quizzes. Creating workbooks filled with activities and resources will add further value to your online course. Exercises and quizzes will also help foster learning in students, ensuring they take away everything they can from your course so they’ll achieve an outcome.
Step #4: Positioning Yourself & Your Course
When people think “branding,” they think fancy logos and catchy phrases. While persuasive visual and text copy are certainly important to a brand, they should only be created AFTER you’ve established how you’re going to position yourself in your market.
A major step to building your course brand is by building the brand of the person teaching it: YOU.
Ask yourself: How do YOU want to be viewed?
Tell your audience about yourself. They don’t know you, so for now, you’re just another face on a screen trying to sell them something. Tell them what makes you credible to teach, and why they
The great thing about an online course is that it allows you to position yourself as an expert in your field. Hopefully, you’ve picked a niche that’s profitable (step #1) and offers you the ability to create additional courses (should you want to later down the line).
Once you know how you’re positioning yourself and your course, you can then move on to creating your online course website and logo.
Step #5: Create Your Sales Page
Don’t overlook the importance of a convincing and attractive sales page. After all, the main purpose of your online course sales page is to convert visitors into students. To do this, your sales page needs to hit three points:
- Who your course is for. Describe the problems of your target audience. Be specific. Your audience will directly relate to the problem you are describing, allowing you to instantly form a connection with them.
- How you’re going to solve their problems. Give a brief walkthrough on how your course is going to solve your students’ problems.
- Desired outcome. Talk about the outcome of your course. Inform students how your course will change their lives personally/professionally.
Your sales page is where you’ll create the foundation of your relationship with your students. Make it a good one. Here are some helpful resources to check out:
How to Create a Course Sales Page That Converts
Learn From the Best: What Does the Ultimate Online Course Sales Page Look Like?
Step #6: Growth: Start Building Your Audience – Create a Lead Magnet
New online course creators tend to fall into the trap of starting things chronologically. My biggest advice: Don’t wait till after you launched to market your course!
Even while creating your course, you should be taking steps towards building your subscription and email list. Actively building your audience BEFORE your course officially launches will also build credibility and value.
Here are a couple of ways to get started with your list:
- Blog. You’re on my blog right now! Having a blog is a great way to attract site traffic and increase your brand visibility. Regularly updating will have visitors coming back to your site, creating a relationship between you and them. Being consistent in your blogging also shows credibility and your commitment to your course.
- Create leads. Offer free valuable content in exchange for people signing up for your newsletters. Remember, your content is the incentive behind people subscribing, so don’t skimp on quality and make sure it’s relevant to your course material. Think of it as an opportunity to show your audience your value, expertise, and personal teaching style.
Once you start building your email list, send out automated emails and track your open rates/engagements. If you have a high click-through rate, you’ll know you’re in pretty good shape!
Read More: How to Grow Your Email List with Leads
Idea: How to Create a
Step #7: Create: Turning Your Outline (Step #2) Into Your Course Content
At this point, you should know how many lessons/videos you need to record and what each lesson covers. If you’re recording yourself on camera, I recommend you type up a script to help outline what you’re going to cover in each lesson. If you’re recording
Once you know what you’re going to be talking about, it’s time to create your content…but wait! Here’s a tip I wish I had
Create your first section of lessons and course material first, then begin selling your course to a select audience (I’ll cover this more in Step #9). As soon as you sell your course, you’ll start to get feedback from students. Here, students can tell you what they liked and what they didn’t.
For example: After selling your online course, one of your students comments that your lesson audio is choppy. If you waited to sell your course AFTER it was complete, you would now have to spend additional time and money rerecording all your lessons. Plus, you’ll have a lot of upset customers. But because you sold your course before it was complete, you’ll be able to resolve your audio issues before your course officially goes live.
You’ll also get positive feedback. Students will tell you what they liked and what they wished there was more of. The point of receiving feedback is to be able to take your students’ suggestions and tailor your remaining content to their needs and desires. Knowing how much you need to add or change will also give you a good indication of how much time and effort you’ll need to finish the rest of your lessons.
Read this post to learn how to record high-quality video from your home for next to nothing.
Step #8: Price: Determining Your Course’s Value
How much you can charge for your course depends on various factors, such as experience, outcome, market saturation, etc..
You don’t want to pick a price that will turn students off to enrolling in your course, but you also need to pick a figure high enough to turn a profit
There’s no magic formula that will give you the “right” price point, so I advise you to pick a premium price you can justify. I see so many new online course creators sell their course for cheap—hoping to attract more customers initially. To the new creator, getting more initial conversions is a stepping stone to increasing prices as time goes on. The logic here isn’t necessarily wrong, but it is impractical. Underpricing is an unsustainable tactic and requires mass selling in order for you to cover expenses, never mind profit. Would you rather have to sell 100 courses at $15 each or 10 courses at $150?
If you find yourself debating between two price points, run a test. Offer the same course at different price points and see which price leads to more conversions AND more revenue. Find the sweet spot between student quality and quantity.
Ways to increase your course’s price tag:
- Offer bonus content
- Offer one-on-one advising/sessions
- Have office hours
- Create additional activities & resources
- Create a community
- Offer a certificate
Additionally, as you build your brand and increase your credibility and authority in your field, more people will come to value your content. As a result, you’ll be able to charge more.
Step #9: Beta Testing: Getting Feedback
As I mentioned previously, you don’t need to wait until you’ve completed all your lessons to start selling your course. In addition to creating a flowing stream of revenue, selling your course before it’s complete will allow you to make changes based on customer feedback. This will allow you to make your content stronger and more personal to your target niche.
When your course is finally complete, you should also consider having a beta launch first. During a beta launch, you’ll sell your course to a smaller, restricted audience for a lower price. In return for the discount, these students will “test” your course and provide you with helpful feedback so you can address any site/lesson issues before your official launch.
Tip: If you receive positive feedback from your beta testers, ask them if you can make their feedback public. This will give your course positive testimonials/reviews before it officially launches!
Read More: Different Ways to Invite People to Your Beta Test
Step #10: Pre-Launch: Preparing For the Big Day
Once you’ve adjusted your course based on beta feedback, it’s time to get excited about the big day! Throughout the course creation process, you’ve been blogging, sending out newsletters, and announcements (hopefully in social media). As you grow closer to your launch date (approximately 3-4 weeks out), you should begin advertising your launch MORE aggressively. Avoid sending out regular blog announcement emails. Instead, all your emails and promotional social media campaigns should be centered around pre-selling your course and generating hype.
During your pre-launch, you should type up an email to send to all your subscribers when your course officially goes live. If you’ve been keeping a regular blog/social media presence, create a launch post. In your text, remind people of your value. Mention your audience’s goals and explain how your course will help them. Take the time to craft different posts for each platform.
You put a lot of effort into making your online course, which is why it’s crucial you put an equal amount of effort into selling it. Here’s an easy-to-implement and effective launch checklist that has been used by my clients: 6-Week Checklist for Launching an Online Course.
Think you need a big launch to build a big business? Think again. Top Online Course Myths You Need to Stop Believing
Last Step! Launch: Keeping the Hype
Don’t start relaxing now. You got people interested, but now you need to get them to buy. The way to get your audience to convert is by inspiring immediate action. Creating an element of scarcity for your course is a great way to do this. This can be done in two ways:
- Limit student enrollment. Putting a cap on how many students can join your course at a time will prompt your audience to convert.
- Have an open-close course. Instead of limiting the number of students who can enroll, you’re limiting when they can. Having a purchasing window will make your students act now rather than later in the fear of missing out.
Be receptive to student feedback. Monitor how your students are doing in your course. Before you even worry about scaling, you should make sure your students are engaged and completing your course. If you’re noticing high churn rates, read up on the top reasons why students aren’t completing your online course.
After launch, you’ll want to keep the same energy level as your pre-launch. It doesn’t matter how great your course is, your customers aren’t going to want to pay for the same content again. Focus on attracting new customers, but don’t forget about the ones you already have. Keep up with your blogging and social media posts. Post all your testimonials and add fresh content when you can.
At the end of the day, you’re not just selling your course, you’re selling YOU. Maintaining a positive relationship with your customers will help you sell additional content down the line.
Read More: How to Successfully Market and Sell Your Online Course
Phew! You made it to the end.
Hopefully, you’ve found this guide helpful. I’d wish you good luck on starting your online course adventure, but I have a feeling you won’t need it.
Receive free online course and membership site business advice,
weekly blog posts, podcast and video content. Sign up now.
I will like to be part of Client Engagement Academy